Thursday, May 29, 2014

Lock'n Long Hair Extension Application

Yesterday I introduced you to Lock'n Long Hair Extensions. You can read my review here. Today I want to show you just how easy they are to apply. 


First and for most, they have a few application videos up on their site that are worth watching. I watched the video 3 times before applying them and then watched and paused the video when I actually applied them.

I also used this guide on their site for placement.

Here I am before the extensions.


In this post I'm applying a side extension. In my excitement I forgot to take pics while I was applying them the first time, so I took one out and put the looper back in it (they are reusable) and tested the reusability and took the opportunity to show you just how easy they are to apply.


First I parted my hair in a straight line using a comb. I then placed the extension where I wanted it. 


So I could have both hands free, I clipped the extension where I wanted it. 


Using a comb, I put the pointed bottom of the comb through the looper and pulled the tiniest amount of hair through the looper. You seriously just need a pinch of hair. If you take too much you will have a tough time pulling it through the lock bar. If you have too much, don't force it, just take a little less hair and try again.


 Grab the bottom of the looper, and gently pull it through the lock bar.


 Once it is all the way through, hold the extension piece close to the scalp and using the included locking tool, lock your extension.


 The locking tool is like small pliers. Just place the lock bar inside the tool and gently squeeze. The lock bars are coated in silicon inside to prevent damage to your hair. 


Follow this same step for each section and you're done! It really is that easy! The back was the hardest part because I had to use a mirror to make sure I parted my hair straight and then just had to feel for each lock bar. But it wasn't bad at all once I got past my nerves. 

AFTER


Don't forget, the folks at Lock'n Long Hair Extensions are offering my readers an exclusive 40% off discount on their extensions. Just use code 40CultNails at checkout.

Disclosure: The Lock'n Long Hair Extensions were provided to me for review purposes. The opinions however are my own.

Lock'n Long Hair Extensions Review

You may have seen my extensions on Instagram already, and after almost a full week in, I'm ready to give a review of the Lock'n Long Hair Extensions. I received my extensions last Friday, the day before I was set to officiate a friend's wedding and my daughter's graduation from High School. My parent's and in laws just arrived the night before and I had a lot on my plate. But now that they were here, I wanted to play!

Lock'n Long Hair Extensions Fine Glam Set
Lock'n Long Hair Extensions were created by Danielle, when she wanted perfect hair for her wedding. She opted for extensions to give her the princess hair she dreamed of, only to find out that they were going to set her back $800. Loving the look of her hair with extensions and knowing there had to be a better option, Danielle eventually founded Lock'n Long Hair Extensions with a patent pending hair extension product.

Oddly enough, I found Danielle because I didn't want to pay $900 for extensions! As many of you know, I cut my long hair about 2 years ago. By now my hair should be past my shoulders, but I have been having a blast with my short hair and now, the stage I hate has arrived. It is at this stage, every time I cut my hair where extensions enter my life. I just can't stand how it feels having my hair graze my shoulders. I can't explain it, but the feeling is just so uncomfortable to me. I have done clip ins, glue ins, and sew ins. I even had micro mini braids once. But it's been 9 years since my last trip with short hair, and extensions have come a long way since then! Thank goodness, because nothing was more uncomfortable than sew in and glue in extensions! Clip ins were great, except I had to re-apply them every morning. I am a DIYer by nature, but I was seriously considering having my stylist install a set of micro bead extensions.

Last time I was at the salon, my stylist showed me some samples of micro bead extensions, and explained how they work. The cost of the extensions would be $500 and the install would be about $400 based on how long it took to apply. I asked if I could buy the extensions and then maybe wait a month or two to apply them to break up the cost a bit. Kind of like an extension lay a way. LOL! She was totally fine with that. But probably because I have been going to her for 2 years now and she knows I'll come back and get them installed. Well I came home and researched and researched and found Lock'n Long Extensions. You install these yourself using their patent pending Lockbar system in 15 minutes. And the cost? $299. Same quality human hair extensions, same 5 to 7 week wear time before needing to tighten them and they last a year or more based on how you care for them. But for just a fraction of the price. Hmmm….

Before

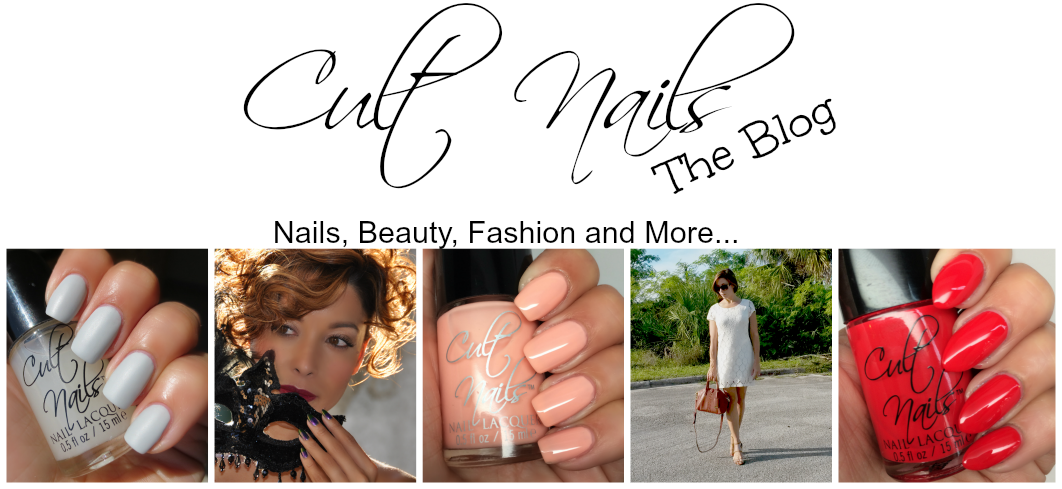
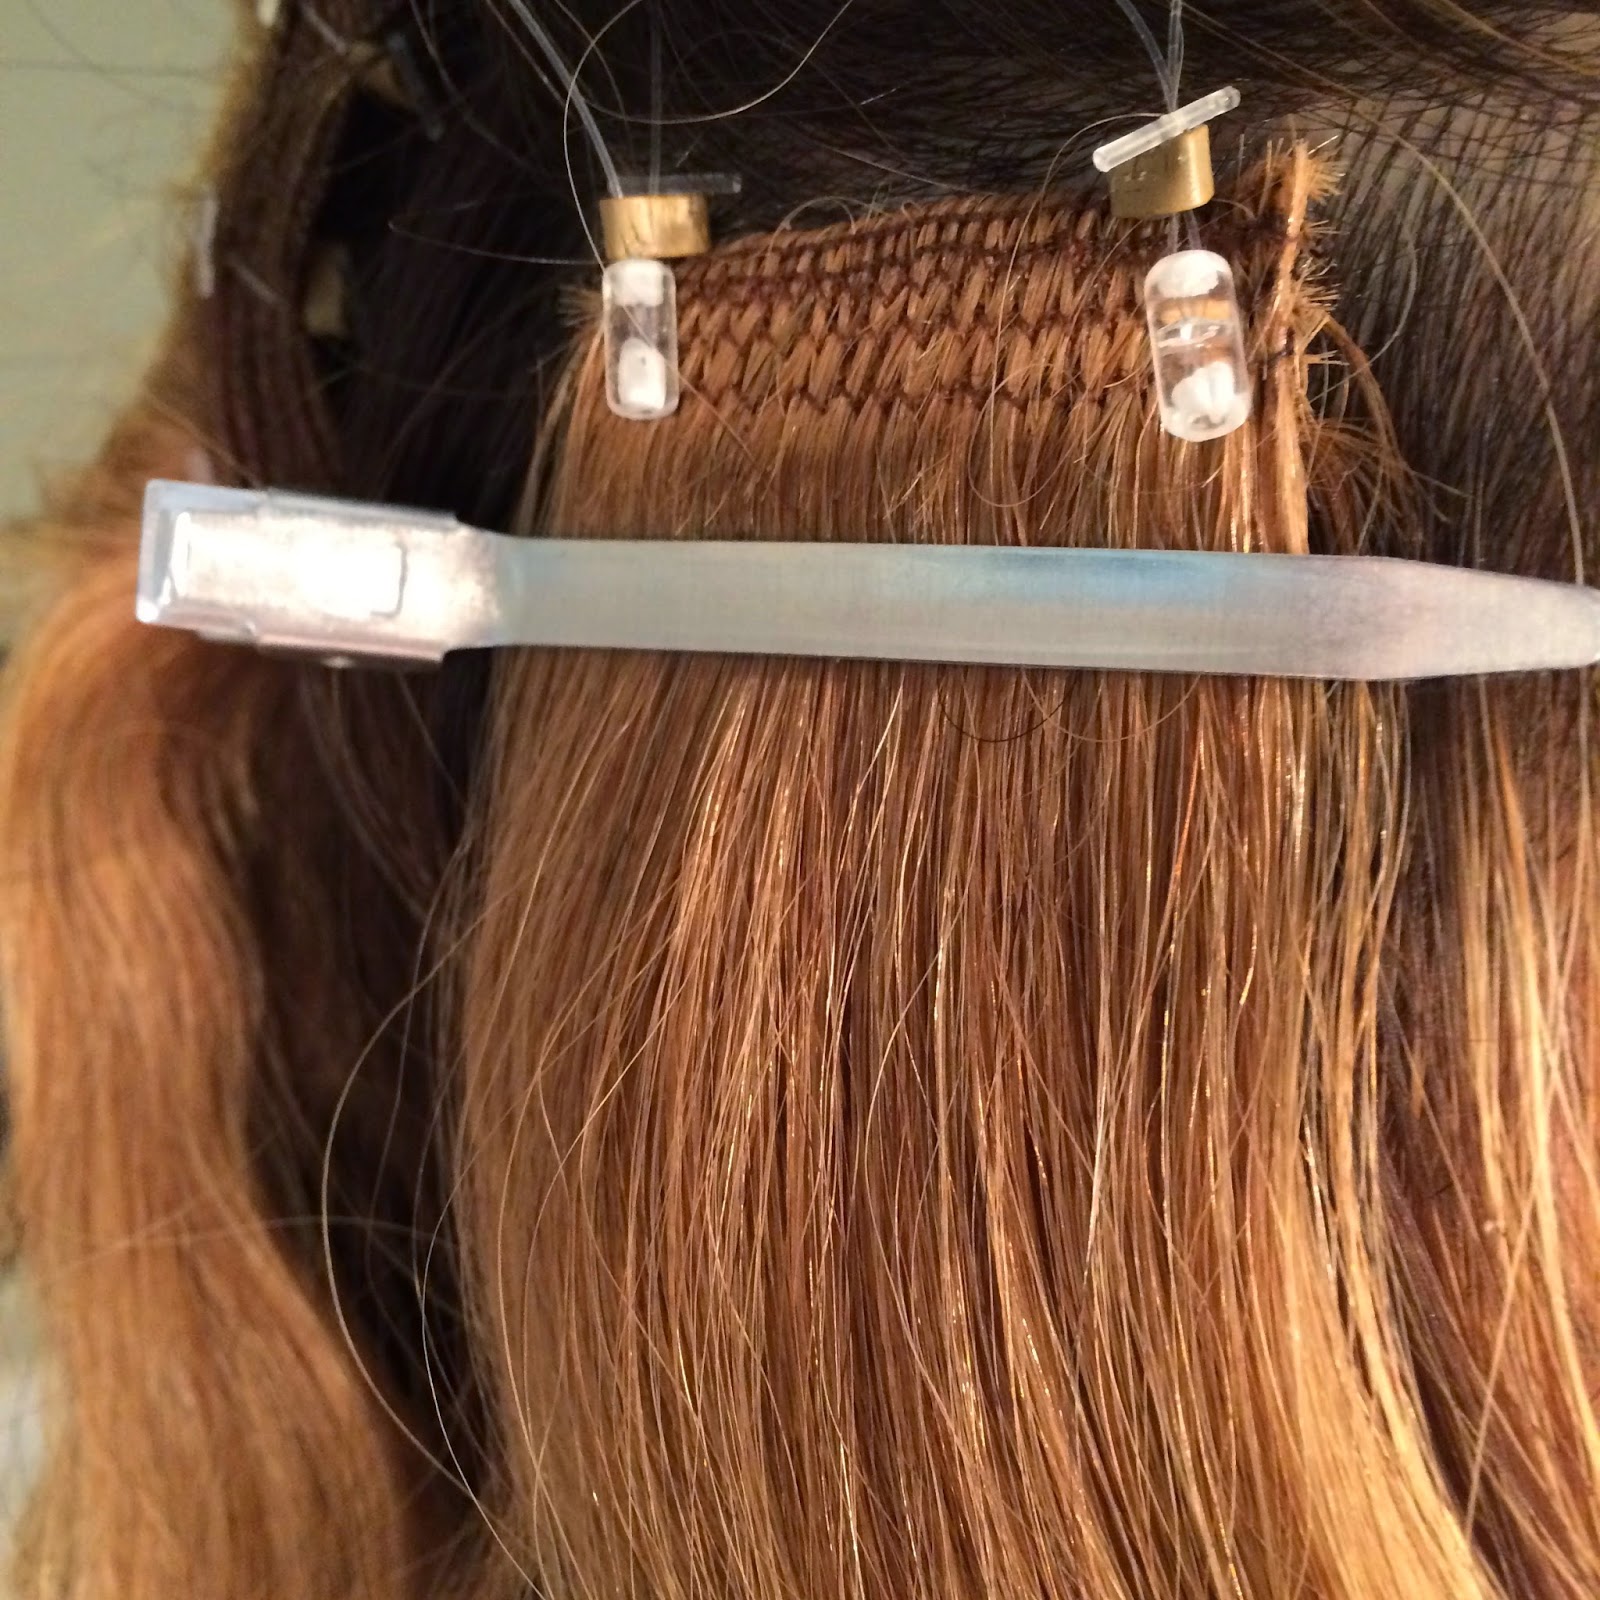
OK so first things first. They arrived and I couldn't wait to play. With just 2 hours until my friends wedding, I bit the bullet, figuring, I had at least an hour to play. I had already watched the installation video a good 3 times. Now I turned it on and followed along pausing it along the way. But I did not actually install them! I pinned them in using bobby pins. Why would I do that? Well, because I never used these before and I wanted to make sure I got the placement right for me and I wanted to see how it would look in my above the shoulder length hair. When I let all my hair down, played around for a bit, blended them and I was ready to take the plunge and install them! So  I lifted my hair section by section and tightened the lock bars. Here is where it got tricky. I was a nervous wreck about officiating my friends wedding. My hands were shaking, I was so nervous! How the heck was I going to clamp down these lock bars with my shaky hands? John came to the rescue and clamped the first row behind my head, then he disappeared and said he'd be right back. After 10 mins of waiting for John to come back, I got impatient and did the next row myself. OMG! I did it! It was so easy! Because I had them clipped in using the included clips, I just felt for each lock bar and used the locking tool included and gave it a squeeze. I think the row took me about a minute to clamp! I was so impressed. I then did the two side pieces and by the time John came back up to help, I was already done. Total time including my trial run with bobby pins, playing around to see if they would blend, my nerves and waiting for John - 57 mins. OK so it wasn't 15 minutes, but it would have taken me about 20 minutes total I think if I eliminate the trial, playing around with them and waiting on John. (I'll cover installation in a separate post tomorrow since this one is so long already.) I imagine it will only get quicker now that I know how to apply them.

After - Lock'n Long Hair Extensions

After with Lock'n Long Hair Extensions 

I left them long and mermaid like for the first 2 days. But it really was too drastic a look from my short hair to long hair. So again my impatience set in and I took scissors to my hair and cut them. Well actually, I had John to the back, but you get the idea. I know I should have waited so I could have my stylist do them for me, but oh that darn impatience! John cut them a little shorter than I wanted, but in all honesty, it's the perfect length. But I do miss the mermaid length.

Lock'n Long Hair Extensions Review

I find the extensions comfortable, but it was weird sleeping in them the first night. I sprayed my hair with leave in conditioner and set them in loose french braids. But it felt different than my head normally feels and I found myself waking several times in the night to make sure they were still there. HA! After the first night, I've been fine.

Lock'n Long Hair Extensions 

Final impression - these extensions are amazing! I ordered them in #12 Midtown Brown and they are a perfect match! I installed them on a record breaking heat day. Spent the morning on a windy beach, the night outside for my daughter's graduation and anywhere from an hour to a full day at the beach every day since installing them. They've been in the ocean and washed in the shower and still in perfect condition. My only "issue" is that because my hair is so short, I would benefit from an additional row of extensions. So my issue is with my hair, not the extensions? I received the 4 piece Fine Glam set and would benefit better from the 5 piece Full Glam set. Fortunately you can order additional accent pieces, and I did just that. All in all, this is a great alternative to salon installed extensions. My favorite part has to be that because I am the one putting them in and taking them out and because they can be re-used, I can put them in for a week if I want, take them out and then put them back in when I want.  Or I can leave them in for 5-7 weeks, tighten them and keep them in or take them out after a month. It is completely up to me! (Oh and did I mention my stylist told me it cost the same $400 for removal or tightening?) Yup, I'll stick with the Lock'n Long Hair Extensions, thank you!

Can you tell my real hair from the extensions? #12 Midtown Brown is my perfect match! 

Lock'n Long Hair Extensions 

And because the folks over at Lock'n Long Extensions are so awesome, they are offering you all 40% off a set of extensions that retail for $299 or more! Just use code 40CultNails at check out.

So what do you think of my extension transformation?

Disclosure: The Lock'n Long Hair Extensions were provided to me for review purposes. The opinions however are my own.


Wednesday, May 21, 2014

Give Away Time!!

We are just about to 100K likes on Facebook! I can't believe it! I just have to take a moment to thank each and every one of you who either reads the blog, follows us on FB, Twitter or Instagram or who has chosen to become a Cult Nails Lacquer customer. It is thanks to each and every one of you that I get to live my dream. I continue to push forward and learn and grow as a person and a brand because of all your support. So thank you! Thank you! Thank you! I can never say it enough!

Now I warn you, if you don't like my blog posts because I ramble, you may just want to scroll down to the bottom, because I am about to ramble! 

I have been holding a polish hoping that we would one day see 100K likes on FB! And while I want to wait until we get there to kick off the give away, the reality is that things are a bit crazy right now! We had a super last minute move from a beautiful office to a more functional warehouse space that I am still unpacking and organizing, pre-sale orders to prepare and pack and ship, which if all goes well will be done today. (2 days early!) Although sadly I didn't label the box that I put our Cult Nails stickers in and haven't uncovered them yet, so this round goes out without the stickers. But hey I figure you all want the polish more than the sticker. LOL.

My parents and in-laws get into town tomorrow, one of my best friends gets in town tonight. I will be the wedding officiant of my friends small wedding Saturday morning and my oldest, Kat graduates HS Saturday night. I have to get my house completely clean of any and all dog hair since my MIL is severely allergic, so that means shampooing carpets, couches, cleaning curtains etc… We've already started the process, but now it's the final bits that need to be done. I want her to be able to hang out without her allergies getting the best of her. And we are in the middle of planning Allie's graduation party Sunday. Which means more family and friends. WAHOO! I will sleep so well come Sunday night. Ha! Oh and did I mention that Juan started June's DIY challenge early? He finally got the bug and couldn't wait. He's building a dining room table! Cause you know, we're just not busy enough.

My point is, that we plan on "CLOSING" shop for a few days from Tomorrow - Sunday. And by closing I mean, I will answer emails once a day only, and pack orders Friday only and resume business as usual on Monday while still hangin' with the in laws.  I'll still make sure you're taken care of and post on IG and all that so you can keep up with the madness, but other than that, it may be fairly quiet for a few days. Which means, I'm going to start the give away early! WAHOO!!! (yes I know all that to get to this!)

Give Away!!!


We are giving away 1 bottle of Clairvoyant and a necklace made by Ginger Kitty Designs. I have had this put away for quite some time, just for this day! It is extremely limited edition and no we are not bringing it back. There's something to be said for joining the Cult early I guess. But wait there's more! I will load up a box with a lot of surprise goodies and polishes! But what else will be in the box is going to be kept a surprise. This give away will be open internationally, only if I can legally ship the prize to you. 

a Rafflecopter giveaway

Once we reach 100K likes on Facebook, we'll launch a 50% off sale! So keep an eye out for news on the sale! Good luck!

Tuesday, May 20, 2014

May DIY Challenge - Update Coffee Table

We bought our coffee table about 12 - 13 years ago. It was a rustic style solid pine coffee table on a metal base. Over the years, this coffee table was used in the living room, on the back patio and even sat unused in our garage at one point. We had a living room so small, there was no way we could fit this in there. When my girls were little they would stand on the table and jump into our arms and spin. We would stand them up there and they would dance to Teletubbies and the Wiggles. They carved and drew on this table and a personal favorite memory is of John dancing on top of the table for our 15th wedding anniversary. It is the spot where my girls and I gather to do our nails each week. This one table holds so many memories, when I thought of making a new coffee table, I knew I would have a hard time letting this one go. So I started thinking perhaps I could update this one instead. 


After 12+ years of staring at this rusted hardware, I just couldn't stand staring at it for another minute. It just had to go!


We took all the hardware off and bought some coffee table legs. We added the legs to the bottom and switched out the hinges on the top and stained it using Rustoleum Dark Walnut to match the top of our entertainment center. I may sand it a bit because it's a little darker than I want. But at the same time I really like it, so I'm not sure yet.


It also looks a little plain now. I don't know if it's because it had so much going on before, that I am seeing this plain, but I am debating on adding some hardware back to the table. Perhaps some metal corner pieces or handles on two sides? I would paint them matte black to match the hinges we got for the top. 

Or maybe some wood appliqués or overlays? We can stain it to match the table or paint them a matte black.

For now I'm going to leave it plain while I decide what I want to do to it, if anything at all. 


I love the new hinges we put on it. I feel like they add style without taking as much space as the old ones did. I wanted to keep it with a rustic feel, since I know the kids are bound to spill something on it and it's the dedicated nail station in our house. I imagine we'll still need to sand and re-stain this as the years go by. I sealed it with furniture wax vs using a polyurethane coating. But if I lighten it a little, I think I may use a matte polyurethane on it.


So glad to be rid of the rustic base and love the addition of the coffee table legs. 


I think it helps tie in the entertainment center into the room, and helps anchor the room with something that still lets the wood be the feature since the rest of the wood furniture is painted in our living room.


Before and After

I would say the living room is finally done, but now I feel like I need a lamp with a stronger looking base. Is a room ever really done?


I'd love to hear what you think as to whether I should leave it as is or add some hardware or appliqués to the table. 

Monday, May 19, 2014

Spotted Mani Fail!

I was feeling pretty good about my nail art skills for about a minute with my water  marble mani, so I thought i'd take a stab at the spotted mani using water and hairspray. 


FAIL!!!


I'll need to try this again when I have a little more time, but for now, it'll have to do because there's just too much to do. 

Tuesday, May 13, 2014

Mark Your Calendar & Join Me For a Night of Shopping & Fun

I'll be hosting a night of shopping and fun at J Grace and Co in Viera, FL on June 12th from 7pm - 9pm! Come join me!


J Grace and Co. is a new boutique at The Avenues in Viera. They offer jewelry designed by the owner of the boutique along with several other well sought after jewelry brands like Alex and Ani, Dogeared and ELLE. The boutique also offers select clothing items from brands like Free People, Hale Bob, Chaser Clothes and more. They also offer private shopping parties for you and your friends. And if that isn't enough to get you there, they also now carry select Cult Nails lacquers!

Photo courtesy of J Grace & Co.
So come celebrate with me and maybe do a little shopping of your own! Light refreshments will be served. I'd love to see you there!

Photo courtesy of J Grace & CO

Where:  The Avenues at Viera
2261 Town Center Ave. # 109
Viera, FL 32940
  •        
When: Thursday, June 12th, 2014 7PM - 9PM

Monday, May 12, 2014

Floral Stamping Nail Art

I hope everyone had a wonderful weekend. The weekend flew by to me. It's like I blinked and it was gone! But it was a perfect weekend. John and I went to a few vintage markets that are popping up in our area and then we hit the beach for a bit. When we came home, I took a quick shower and threw on a maxi dress and settled in to finish binge watching Orphan Black, when John asked if I could get ready in 15 mins and hit up a comedy show. Done! I guess we fit quite a bit in one day. Unfortunately our photos from the comedy show came out a bit blurry. Boo!

With comedian Carmen Vallone
With comedian Dean Napolitanp
For Mother's day, a friend of mine had us over for the most amazing brunch. I ate so much food that I seriously could not even think about dinner Sunday night. Rounding out the weekend, I decided to take my Thrive mani and add some stamping to it.


I was thinking of a few different nail art options, but it's been so long since I have stamped all my nails, I just went for it. I used BM plate 225 to stamp the design on my nails.  I used Radiance to stamp with. (The Spring Radiance collection which includes both of these colors and Alluring is available now. Use code CN24 to save $12 at CultNails.com)


I'm thinking my Mother's Day gift from John may be the reason for my desire to stamp all my nails with leafy flowers. John bought me this cute t-shirt dress from Old Navy and these rose gold sandals. And yup, I'm sitting here wearing my dress with my matching mani!


Hope your weekend was a great one! Stay polished!

Friday, May 9, 2014

Cult Nails Link Up Party!

It's Friday, so let's Link Up! Do you have a Cult Nails mani you featured on your blog in the last two weeks? If so, let's share the love and add your link below! I would like to do these weekly, so we can all see your blogs! I'll choose an entry each week to feature in our Link Up Party. So let's get started and Link Up! 

In the meantime, I'll share my go to color lately. Since we created Falling Hard (several months before it's release), it has been my go to pedi color. But I find I want to change every mani back to Falling Hard. Do you ever get like that? where you really just want to wear one color over and over again? 


Thursday, May 8, 2014

Press Release: Cult Nails Introduces the Spring Radiance Collection

Spring Radiance Collection (l to r): Thrive, Alluring, and Radiance

Cult Nails introduces the Spring Radiance Collection


As part of this presale event, we've teamed up with "Sweet Baby by Donna" to bring you a special offer!  The first 200 orders will get a FREE sample of "Sweet Baby by Donna" cuticle oil!

The "Spring Radiance" Collection is a new, Limited Edition, 3 piece set.  This mini-collection includes three new, full size, Cult Nails shades:  (from left to right in image)  Thrive (a subtley textured mint pastel green, with our now famous Cult Nails shimmer: recommed using a top coat to get a flawless high shine),Alluring (a mauve, leaning neutral, with the most subtle green shimmer), andRadiance (a one coat, purple-berry, creme).  Each bottle of nail lacquer is 0.5 fl oz, approximately 15 mL.

PLEASE NOTE:  We've changed things up a bit this time:  In order to get the presale price ($24.00) you MUST use Coupon Code CN24 when you place your order.  Retail price is $36.00.  Using the coupon code will save you $12.00, like getting one polish FREE!!! 
PRE-ORDER YOUR SET NOW!!! REMEMBER TO USE COUPON CODE CN24 AT CHECKOUT!!!
THRIVE
ALLURING
RADIANCE
  
The first 200 presale orders will receive a FREE sample of "Sweet Baby by Donna" Cuticle Oil!  Check out her etsy shop HERE!
Newer Posts Older Posts Home